Richard Tatti - NightScape Images
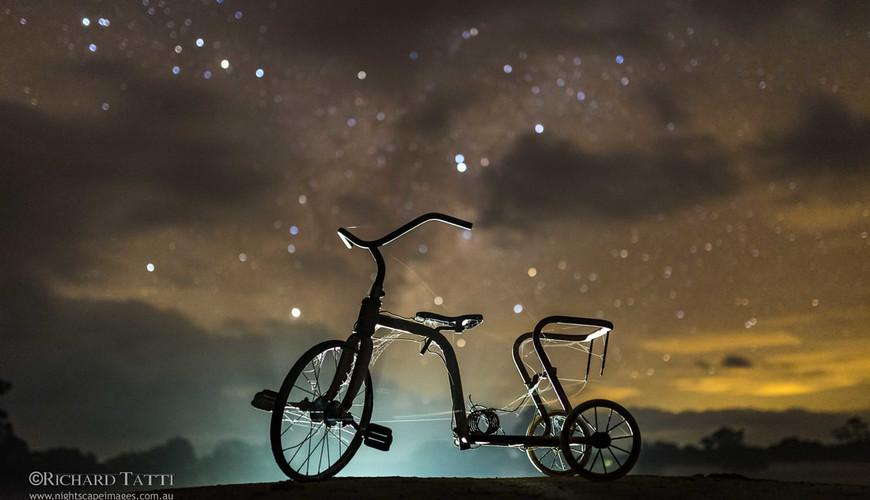
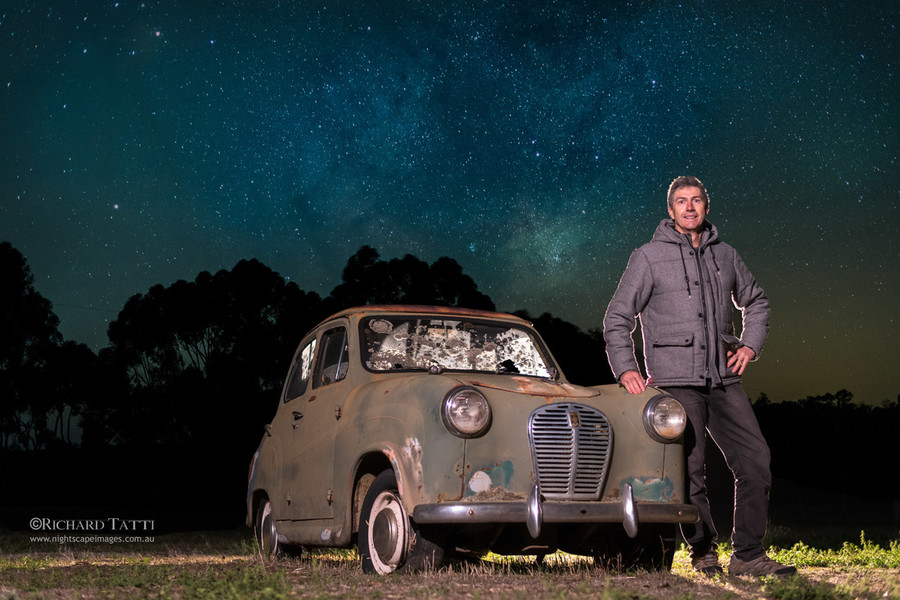
Come for a Ride © Richard Tatti
Richard Tatti hales from Bendigo a country town. Bendigo is one of the last major towns in that part of Victoria which places Richard in a great location for night photography, free from the light pollution of the city of Melbourne. We at Williamstown Camera Club are grateful Richard made the long trip to come along to our club to share his skills through a great presentation to our members.
Of course, Richard is not a stranger to many members of our club, it seems quite a few of us have taken part in his NightScape Workshops.
Going through his process Richard shared quite a bit to help us make great nightscape images as well as regaling us with stories of his adventures in the dark.
Basic Requirements for a Night Sky Image
Dark Sky
Seemingly an easy thing to say... but skies can be not dark enough. If the moon is too full, if you're near a major city creating a lot of light pollution, or a well travelled road with too many headlights. Too much light means your sensor may become flooded with light before you can get a good capture of the stars.
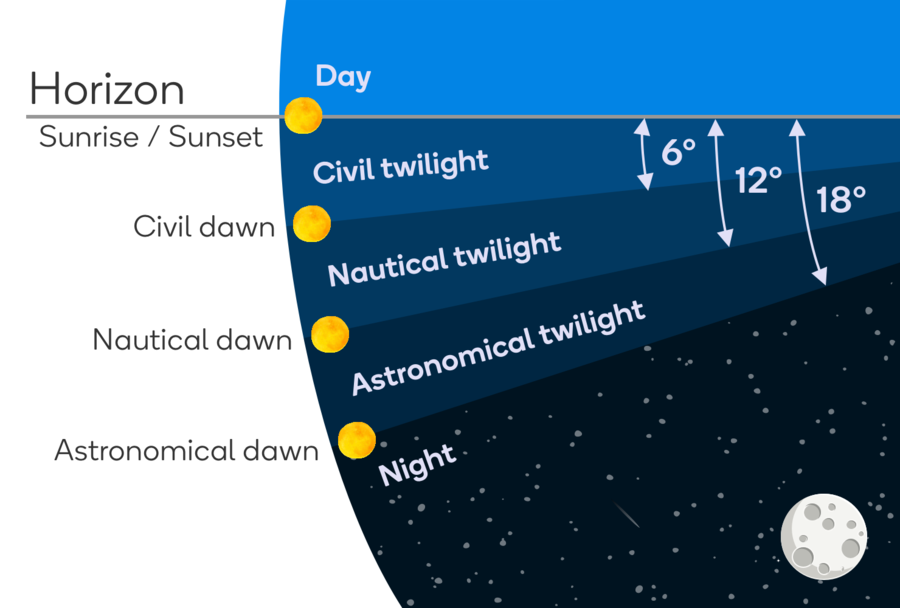
The diagram above shows the stages between sunset and night, each providing its own unique opportunity and challenge. Civil twilight is the time just after sunset, the sky is still blue though it can be tinted warm by the fading sun. During nautical twilight, the light from the sun continues to create enough luminance ensuring we have separation of the horizon and the sky. Astronomical twilight is the time when the sky is dark enough that astronomers with powerful telescopes would start doing their work. To the untrained eye, this is night, but night is still a little way off. When night comes, the clouds are sparse, and the light pollution from nearby towns and cities is not interfering: we have the perfect conditions for "nightscape" photography.
Camera
Cameras come in all shapes and sizes. Richard recommends using a DSLR with a wide-angled lens 14–35mm (full-frame). Better sensors mean less less noise in your images, you should be able to use your camera between ISO 800–6400. More details on settings below.
Sturdy Tripod
Richard says he's always surprised when people skimp on their tripod. A sturdy tripod is required because we need to ensure our camera stays still while we're making our long exposure images, a fundamental requirement of nightscape photography. Even the most gentle breeze can blow a lightweight tripod around resulting in blurry images.
Light
Yeah, we need light on a dark night, but not just to see our way to our location. Mostly we need light because Richard's type of work isn't just about the stars overhead, rather, Richard uses an array of lighting tools to "paint light on the foreground" to add interest to his work.
Richard doesn't spend a lot on his lighting gear, mostly acquiring his tools from places like Ebay. One of the flash units he brought along he described as a Chinese knock-off of a Chinese knock-off. It was truly "no-name" with the only identifying markings I could see on it being " WS-560" A quick search on eBay sees these going for around AU$50. The other flash was a Yongnuo 720, slightly more expensive at around AU$150.
One quick caveat about the super cheap flash units, Richard doesn't use them on his actual camera via the hot shoe. And while he didn't say, I will make mention it may not be good to do so. As they haven't been built for a specific camera, their capacitors aren't likely tested for your expensive camera body and may cause damage if used on your camera directly. I'm not trying to disparage the super-cheap, Richard says they perform perfectly well for him when using them with remote triggers and this is how we'd recommend members use them too.
In addition to flash units, Richard uses a torch with adjustable beam and brightness. It seems they can be found as cheaply as $15 via eBay. The adjustable beam lets one determine the spread of the light and therefore the amount of coverage when you're painting your scene.
Another stand-out product in Richard's kit is an array of LED light panels. One I have personally is the HDV-Z96 Light Panel, awesome little light, they'll set you back around $100 on eBay. Powered by 5 AA batteries, they're also able to take a Sony NP-series batteries as a power source, which I recommend as the AAs don't tend to last very long, and the NP-series batteries can also be purchased as a third-party product on eBay and come in a range of capacities.
When asked about using your car's headlights to paint a scene, we were advised they're typically too bright, and likely to cumbersome to use in most cases. It only takes a little light to illuminate your foreground subjects most of the time. A little extra light is required when you're shooting a large scene.
Most often, Richard gels his light sources with CTO filters. CTO = Colour Temperature Orange. Often torches and white LEDs are very blue in colour. The use of CTP gels will balance the lights and ensure consistent lighting.
You can check out more about Richard's lighting in his blog post " It's all about light." where he details the equipment he uses and how he uses it.
Camera Settings
Manual Everything!
For complete control and consistent results you need to go manual across the board. Don't leave anything up to your camera.
Aperture wide open ƒ1.4–ƒ4
Open your lens the widest you can. A fast lens with an aperture below ƒ4 is ideal. Faster the better.
Shutter Speed: 10–30 seconds
Depending on the amount of ambient light you'll need to adjust this. But you're looking for a shutter speed of 10-30 seconds to capture the stars. Don't go too long else the stars will start to streak in your frame. At the equator, the earth is spinning at about 1,610kph, so it's not surprising the stars will blur. It's considerably slower for us here in Melbourne, but still consequential.
There is this thing called The 500 Rule, but Richard doesn't tend to feel it's a good guide these days. Too often you still need to adjust your timings as the 500 Rule often leaves you with blurry stars.
Of course blurry stars may be what you want, well not blurred, but streaky, producing star trails. In which case, you'll do best if you use an external remote that allows you to keep your shutter open longer than the standard 30 seconds, the limit of most cameras. Sure you can use the bulb setting directly on the camera, but if you're touching your camera you will introduce camera shake to your photo.
You can pick up a fairly cheap external remote for most cameras on eBay, make sure you get the right one for your specific model of camera. They are typically multi-function devices, having a remote trigger that lets you set a shutter time greater than 30 seconds, an intervalometer (so you can take a series of images, for a time lapse), and some other functions.
ISO (Digital Gain) 800-6400
You'll likely be sitting on ISO 3,200 or ISO 6,400. It will likely be a case of trial and error with this until you learn the limits of your camera. You don't need to shy away from noise in your images, but you also don't want so much that you can't discern what is noise and what are stars. Some sensors are better than others, so give it a go and see.
White balance
Set your white balance between 3450k - 5000k, sticking to the warmer tones, and working in with the CTO Gels you've applied to your lights.
Lens Choice
Not really considered a "setting" and we touched on it above, but to clarify: Use a wide angle lens to get your full scene. A lot of the settings above are assuming you're using a focal length below 35mm (full-frame). Anything longer and you'll need to adjust your shutter speed, and you'll likely not have access to the lower (higher? I always get them confused) ƒ-stops of ƒ4 and below, so other things will need to change. But longer lenses can be fun to use to capture panoramas of a full scene and capturing more detail, when merged they'll produce a massive, zoomable file.
Manual Adjust Focus
It's a massive challenge to focus on stars, Richard says he never trusts the ∞ (infinity) symbol on his lenses but most often you're zooming to infinity given your wide angle lens. Most find success in focusing when using the "Live View" function on their camera. Start your live view, zoom the view in (not with the lens, but with the magnifying symbols on your camera), and adjust focus on the stars (with the lens). You should now be right to go.
Optimal Times
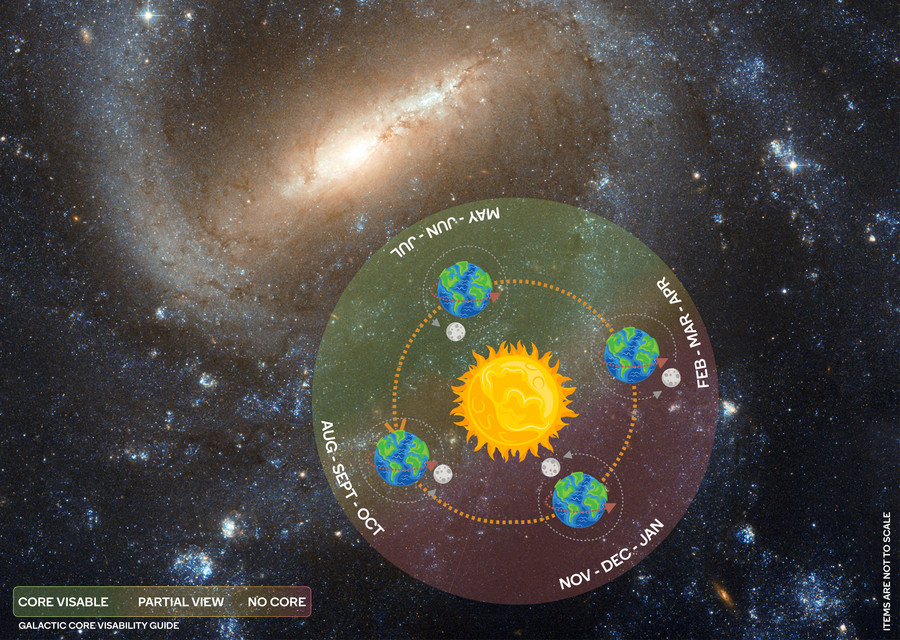
The most dynamic night scape images are made when the Earth's view of the Galactic Core is unobstructed. We're in the Milky Way galaxy, which is a barred spiral galaxy. Exactly what it looks like is up for debate, because we're right inside it, we can't be completely sure, but by observing other galaxies we can see, we kind of know what it looks like. Our sun is just one of around 250 billion (± 150 billion) in our tiny galaxy, and our big ball of gas gets between us and the core of the galaxy, where the highest concentration of stars is, for about 4–5 months of the year.
Our ideal viewing times are between April and August, with the best times to see the whole galactic core in June and July, as illustrated in the diagram below:
Capturing Star Trails
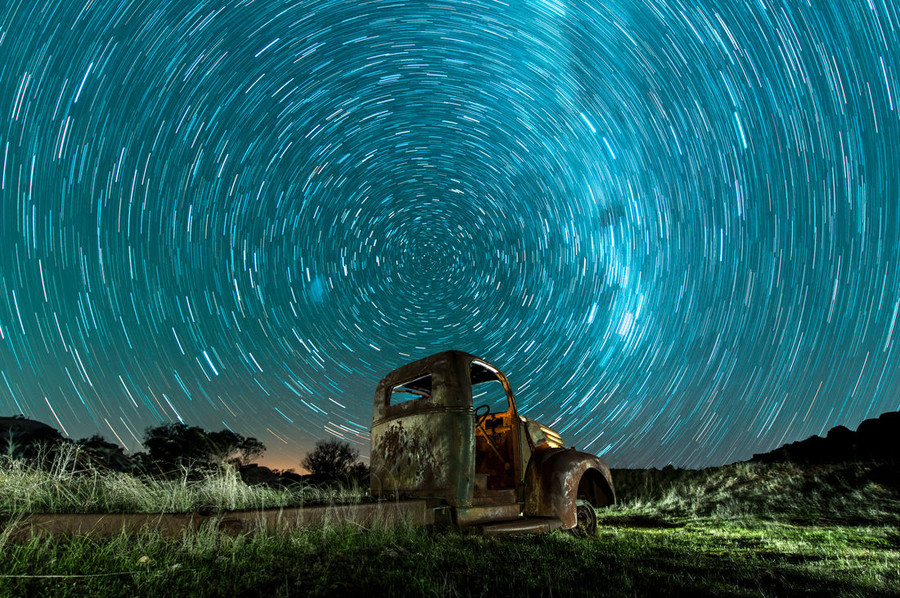
There are a couple of ways to create Star Trails:
- One long exposure - capturing the image as a single very long exposure.
- A series of short duration exposures - later stacked in a photo editing program.
- A series of medium duration exposures - later stacked in a photo editing program - this is Richard's preferred method.
One long exposure has a couple of issues, the main being "hot pixels", when your sensor is working for an extended period of time it heats up and some of the pixels will overheat casing them to be full "on" so you'll see single solid pixels of red, green, and blue in your image. This heating of the sensor also results in more noise being introduced, which you'll just have to deal with later in your post processing.
A series of short duration exposures will result in hundreds of images being required for your final star trail image. The file handling for most computers will be untenable, especially if you're shooting raw, which you should be. You'll likely have to do them in batches... so you may as well use:
A series of medium duration exposures with considerably less images to deal with, this will create a better result more quickly for your post processing.
If you're using a series of short-medium exposed images, consider the time interval required between images when you set up your intervalometer. Your camera will require processing time between shots, different cameras will have different times, so you'll have to do a bit of trail and error for this. Also, turn off long exposure noise reduction, having this on will double your exposure time, and you can deal with the noise in post.
Assistant Applications
Richard let us know about a couple of applications that can help us in our planning and execution of our night scape photography.
PhotoPills
Available on iOS and Android, PhotoPills calls itself "your personal assistant in all photographic matters". It offers calculators for exposure, Depth of Field (DOF), and time lapses. It also includes everything you need for capturing the night sky such as information about the rise of the Sun, the Moon, and the location of the Milky Way. In addition it has an Augmented Reality view so you can hold your device to the sky and find exactly where the Milky Way is for your location.
At time of writing PhotoPills is AU$14.99 on iOS and Android.
Stellarium
Stellarium is free for the desktop. It is also available on Android and iOS. Geared towards the astronomers, this application also offers an augmented reality view of the night sky from your device. At time of writing, Stellarium is free on the desktop, and AU$3.49 on iOS and Android.
Getting the shot
It's one thing to know all the technical information, but it's all for naught if you don't use creative composition and lighting techniques for your images. Richards top tips:
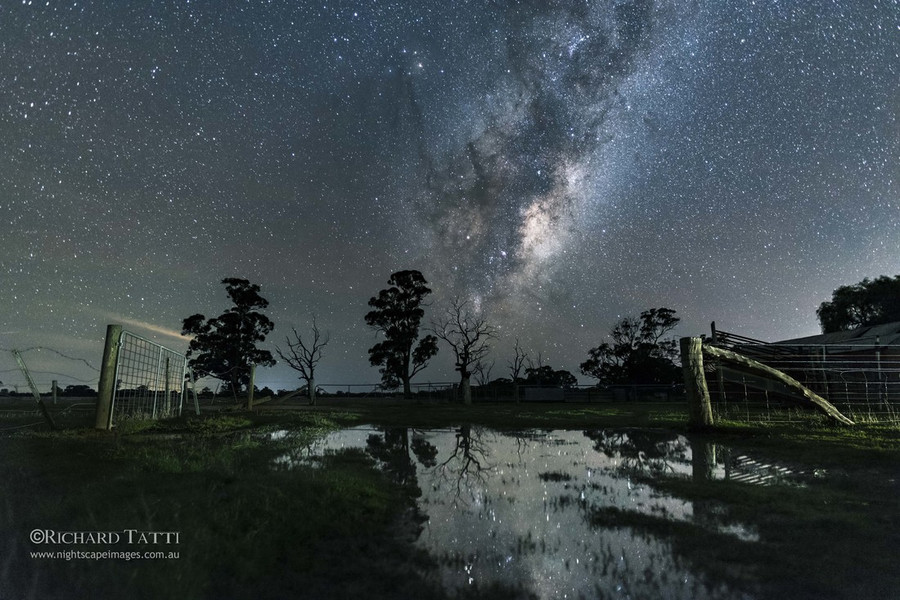
- Get low down. You can turn a puddle into a lake using your wide lens on the edge of the puddle, reflecting the surrounds and the stars in the water.
- Place something in the foreground.
- Use the rule of thirds and leading lines to maintain interest in your composition.
- Light the foreground off-centre of your camera, don't just stand behind the camera and point your light. Like all photography you want to create shadows to bring out texture and interest in your foreground subjects.
- Consider taking multiple images, painting different parts with light in each exposure and layering them later in post to create a stunning image.
And Finally
- Scout locations during daylight hours.
- Mark locations on GPS to find later.
- Learn the manual features for everything on your camera.
- Check your equipment before you leave
- Lenses clean.
- Batteries charged for all devices.
- Memory cards empty (you'll be taking lots of images).
- Make sure everything's working, it's much harder to troubleshoot in the dark.
- Dress warm, it gets cold at night, especially during the months when the sky is most interesting.
- Remember to pack something to keep your lens warm to avoid it fogging up in the cool evening.
- Double-check your focus when shooting.
- Practice different light painting techniques
- Stay safe, it's dark out there, and often the places you'll go to get great night images will be a long way from civilisation, phone reception may be limited. Best let someone know where you're headed if you're going out alone.
- Embrace the beauty of the night sky.
Where to find Richard Tatti
Of course all of the above is made from my notes during the night. I likely missed a thousand things. Richard's talk was engaging and informative, but I'm sure he could only give us a snapshot of his knowledge during a short talk at our club.
I encourage the reader to attend one of Richard's workshops, they receive glowing reports from our members who have attended.
Richard is also on Facebook and posts regularly on his @NightscapeImages Instagram feed.
In addition to the above, Richard is generous with his knowledge via his Nightscape Images YouTube Channel.
All images used with permission by the maker.